A typical dash camera setup will pull power from your cars cigarette adapter or USB port. These power ports usually turn on when you turn your cars key to the accessory mode or start your cars engine. A dash cam is designed to start recording video when it receives power and to stop recording when it stops getting power. This is how it automatically starts and stops recording when turn your car on and off.
Contents
Because your car needs to be on in order for your dash cam to get power, this won’t work if you want to use various parking mode features like impact detection and motion detection. To have your dash camera get power while your car is off, you will need to use a hard wire kit that plugs directly into your cars fuse box.
Is it easy to hardwire a dash cam?
You don’t need any technical experience to hardwire your dash camera into your car. If you have everything ready to go it should take about 30 minutes to install it. In short, you will be plugging an adapter into your cars fuse box and screwing in a ground screw and then running the wire up to your dash cam. Below we have put together a full step-by-step tutorial on how you too can install your own dash cam.
What is a dash cam hardwire kit?
Put simply, it is a way for you to pull power directly from your cars battery when your car is off by wiring the dash cam to the fuse box of your car. You do not have to actually “hardwire” it into your car. The wire uses an adapter (add-a-fuse) to plug into your cars fuse box.
Should you use hardwire kit for your dash cam?
Why would someone want to hard wire their dash cam? If you are deciding on whether or not you should hard wire your dash cam, here are some of the benefits and disadvantages to using a hardwire kit with your car camera.
The 2 main reasons someone would hardwire their dash cam are to hide the wires and to give the dash cam a constant power source to use the cameras parking mode features.
If you don’t plan on using your dash cams parking mode features and the wires coming from your cars cigarette or USB adapter leading up to your dash cam don’t bother you, we would recommend not using a hardwire kit and sticking with the default setup.
PROS
- Wires are less visible;
- Frees up your cars cigarette or USB adapter;
- It won’t accidentally get unplugged;
- It can always pull power, even if your car is off.
CONS
- You may need to buy a separate hardwire kit (around $15);
- It is more time consuming and difficult to install.
What hardwire kit to buy for your dash cam
There are 2 main things you need to know before buying a hardwire kit for your dash cam: what kind of USB cord does your dash cam use and what fuse type does your car use. Below we explain this a bit more.
What kind of USB plug does your dash cam use?
There are 2 main types of USB connectors used on most dash cameras: MINI USB & MICRO USB

You’ll want to determine what kind of USB plug your dash cam uses before you buy a hardwire kit. You should be able to figure this out by looking at the USB plug, or by reading the user manual or sales page specs on Amazon or the manufactures website.
What kind of fuse does your car use?
You will also need to find out what kind of fuse your car uses. The hardwire kit you get for your dash cam uses a fuse adapter that plugs directly into the fuse box on your car.
Here are the most common types of car fuses:
ATO/ATS, Micro Fuse, Micro2 Fuse or Mini Fuse. Most universal dash cam hard wire kits will come with an option for each of these car fuses.

A simple Google search can help you figure out what kind of fuses your car uses. For example, searching “1998 toyota 4runner fuse type” lets us know that it uses a Mini Fuse type.
How to install dash cam hardwire kit?
We’ll go over how to install your dash cam hardwire kit in your car in 4 steps outlined below.
- Find your cars fuse box
You will need to find your cars main fuse box where the Cigarette Adapter or “Accessories” fuse is located. This will usually be under the glove box or under the steering wheel area, although it can sometimes be up in the engine compartment. You may need to look at your cars user manual or do some Google searches to find out where it is.
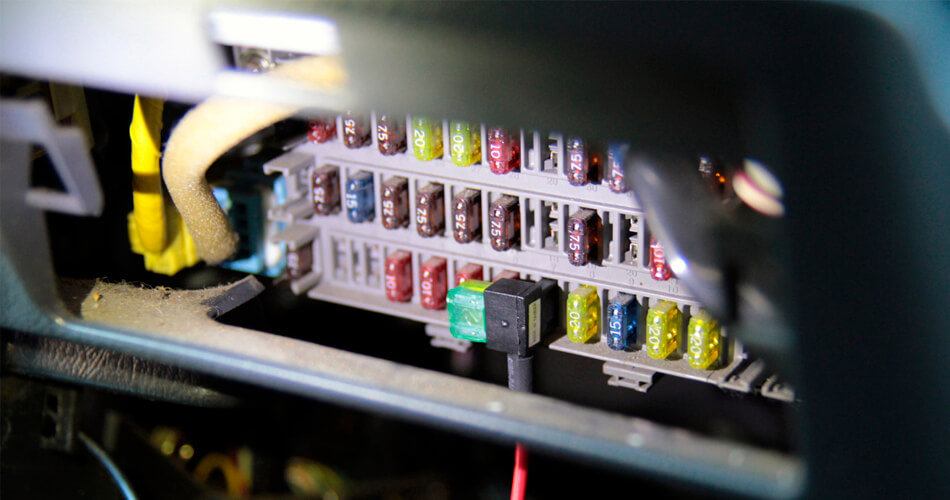
Your fuse box might look something like this:
Once you have located your fuse box and opened it up, you should be able to get a look at all the fuses. Many cars put a diagram on the back of the fuse box cover or door. Check there to see if you have a list of what all the fuses are for. If you don’t see a fuse diagram list on your fuse box cover, try doing a Google search for “2010 toyota camery fuse box diagram” (replacing with your cars details).
You will want to find the fuse that turns off when your car turns off. This is called a “Switched Fuse” as it’s switched on and off when you start and stop your car.
The most common fuse people use to plug their dash camera in is the ACCESSORIES fuse.
This fuse will usually be labeled: ACC or CIG. The ACC, CIG or Accessory is the fuse that goes to your cars cigarette power adapter or USB adapter. - Plugging hardwire kit into fuse box
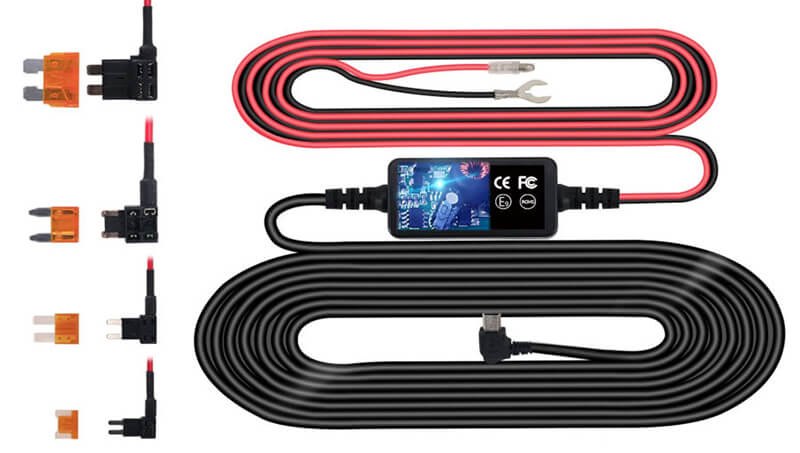
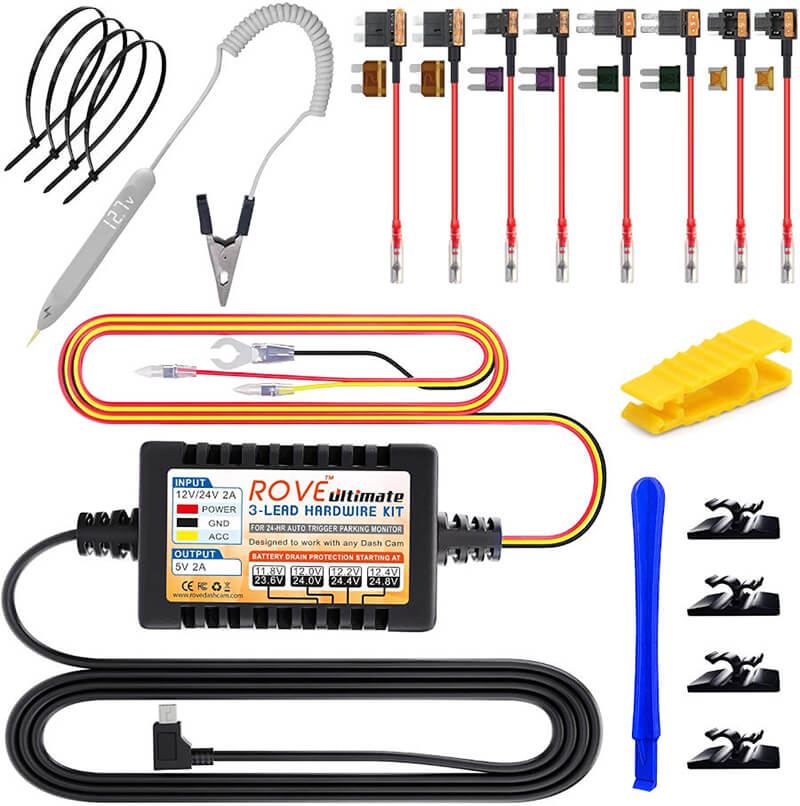
Most dash cam hardwire kits will come with either 2 or 3 wires. This is what each of the wires is for.
RED WIRE (ACC)
This is your main on and off power to the dash cam. This will plug into the ACC or Accessories/CIG Adapter fuse. Make sure the dash cam hardwire kit comes with an “ADD-A-FUSE” connector, like the one pictured below. This is how you will plug the hardwire kit into your fuse box.
There are 2 fuse slots on this fuse adapter, your hardwire kit should come with a fuse already in it, on the top slot that is in line with the wire. This is the fuse for the dash cam.
If there is not one in there and you need to get one, a 5a (5 AMP) fuse is the most common sized fuse used on dash cams. The bottom fuse slot is where you put your existing car fuse. Once you have both fuses in the slots, you can then insert the fuse adapter into your cars fuse box.
BLACK WIRE (GND)
This is the ground wire and needs to be screwed into the metal body of the car. The ground wire should be connected to bare metal with no paint or plastic either on the screw or car panel or bracket. Look for black wires coming off of other electronics, such as your car stereo. These will have a ground wire screwed into metal on your car. This is a good ground spot for your dash cam hardwire kit.
YELLOW WIRE (B+) – B+ or BATT+ is for battery.
The yellow wire, or 3rd wire is on some more advanced hardwire kits that are intended to be used with parking mode features on a dash cam. People often ask what they should do with the 3rd yellow wire. The yellow wire is is meant to be plugged into a fuse slot that receives continuous or always on power from the car batter so you can use parking mode features.
If you do no want to use parking mode features or have your dash cam receive power when your car is off, you should be able to leave the yellow wire disconnected and tape the ends off with electrical tape. Read your dash cam hardwire kit user manual to make sure what you need to do with the extra yellow wire. Disable all of the parking features within the dash cam settings area.
Finding an always on “Constant Fuse” for 3rd Yellow Wire
If you plan to use all of the parking mode features on your dash cam, you will want the 3rd wire of the hardwire kit to be plugged into a fuse slot that always receives power.
An always on fuse goes to items in your car that you can turn on, even when your car is off and no key is in the ignition. Things like your dome light, emergency lights and headlights. These always on fuse slots might sometimes be refereed to as “B+” fuse slot. You can plug your fuse adapter into the always on fuse slot the same as you would with your ACC red wire. - Mounting your dash cam
Once you have installed your hardwire kit into your cars fuse box, you will want to mount your dash cam onto the windshield. You should do this before you run the wire up, that way you know what length you will need.
- Routing and Hiding Wires
After you have installed and tested that your hardwire kit is working properly, you will want to then clean up the wires and route them up to your dash cam.
Your dash cams should come with a long enough wire to make it down the side of your windshield and to your fuse box to have some wire left over.
Route the wires from the top of your windshield down to your hardwire kit at the fuse box. Most cars will have a “headliner” panel at the top of the windshield. You should be able to tuck the wire in this top headliner and run the wire to the top corner of the windshield. From here, it will differ greatly from car to car. Ideally you will have a plastic panel that you can stuff/push the wire behind and run it down the side of the windshield and down to the fuse box.


What Dash Cam Hardwire Kit We Recommend?
Make sure you check to see if your dash camera uses a MICRO or MINI USB plug. The hardwire kit will have one of the 2 USB connections.
Best Dash Cam Hardwire Kit for MINI USB Connection
ROVE Ultimate Dash Cam Hardwire Kit
MINI USB Connection. This universal hardwire kit comes with a variety of different fuse types and is compatible with most makes and models of cars and trucks.
This will work on the following dash cam brands: Rove, Vantop, Nextbase, APEMAN, Garmin Dash Cam, AKASO, Rexing, Byakov, AKASO, Pathinglek, peztio, OldShark, TOGUARD, Jeemak,Trekpow,Byakov and other dash cams with a mini usb port.
Best Dash Cam Hardwire Kit for MICRO USB Connection
Micro USB connection. This hardwire kit is a 2 wire system that can be used to power your dash cam on and off automatically when you start your car. If you want to use advanced parking mode features, you will need a 3 wire hardwire kit.

This will work on VIOFO, KDLINKS, G1W and other dash cams using a micro USB plug.
Check Price on Amazon